
Forms and lead capture
With the form builder, admins create contact and lead forms that you embed on your own website. Each submission can automatically send a confirmation email, create a customer in the CRM, create a card or a deal, and open a ticket in the inbox. This page explains what happens behind the scenes and where you can check what became of a submission.
Where to find it
Section titled “Where to find it”Administration › “Forms”. The page is called “Form builder” and is only visible to admins.
On the overview, “New form” creates an empty form, “Templates” starts you off from a ready-made template, and “Import” loads a file you exported earlier. For each form, the list shows the status (“Draft”, “Published”, “Archived”), the number of submissions and the language. Each form has the actions “Submissions”, “Embed”, “Preview”, “Export”, “Create copy” and “Copy & translate with AI”. “Delete” only appears for archived forms.

In the “Edit form” editor, you’ll find the buttons “Publish” or “Unpublish”, “Preview” and “Save” at the top. A form only accepts submissions once it is published. “Unpublish” sets it back to “Draft”. Archiving makes it permanently unreachable (confirmation: “Really archive this form? It will no longer be reachable afterwards.”).
Related settings: Custom fields for field mapping, General settings for double opt-in, Email inbox for the mailbox that sends the customer email.
What happens on submission
Section titled “What happens on submission”As soon as a visitor clicks “Submit”, 5sDesk first checks spam protection, required fields, formats and files. Only then is the submission accepted. The steps then run in this order:
- The submission is saved with all field values and uploaded files.
- “Send an email to the customer”: a confirmation email to the address in the selected recipient field.
- “Send an internal notification”: an email to a specific agent or another address.
- “Create a CRM customer”: finds or creates the customer, with a company if needed.
- “Create a card on a board”: a card on a board or a deal in a pipeline.
- “Create a ticket in the inbox”: a new ticket in the inbox.
Each step runs independently of the others. If the customer email fails, for example, the customer, card and ticket are still created. The result of each step is shown on the submission under “Actions” (see Submission results). Only the steps switched on in the form under “After submitting” are carried out. The others show “Not configured”.
Customer and company
Section titled “Customer and company”Matching by email address only
Section titled “Matching by email address only”The “Create a CRM customer” step searches only by the email address from the mapped “Email field” (upper and lower case don’t matter). If a customer with this address already exists, that customer is used and the submission shows “Already existed”. This also applies if the address is an additional email address of a customer.
An existing customer is never changed in the process. Name, company, salutation, language, custom fields and marketing consent are never overwritten afterwards. An anonymous form submission should not reset data that your agents maintain. The help text in the builder puts it like this: “Creates a customer for every submission (or reuses an existing one with the same email address, without overwriting their data).”
Required fields for a new customer
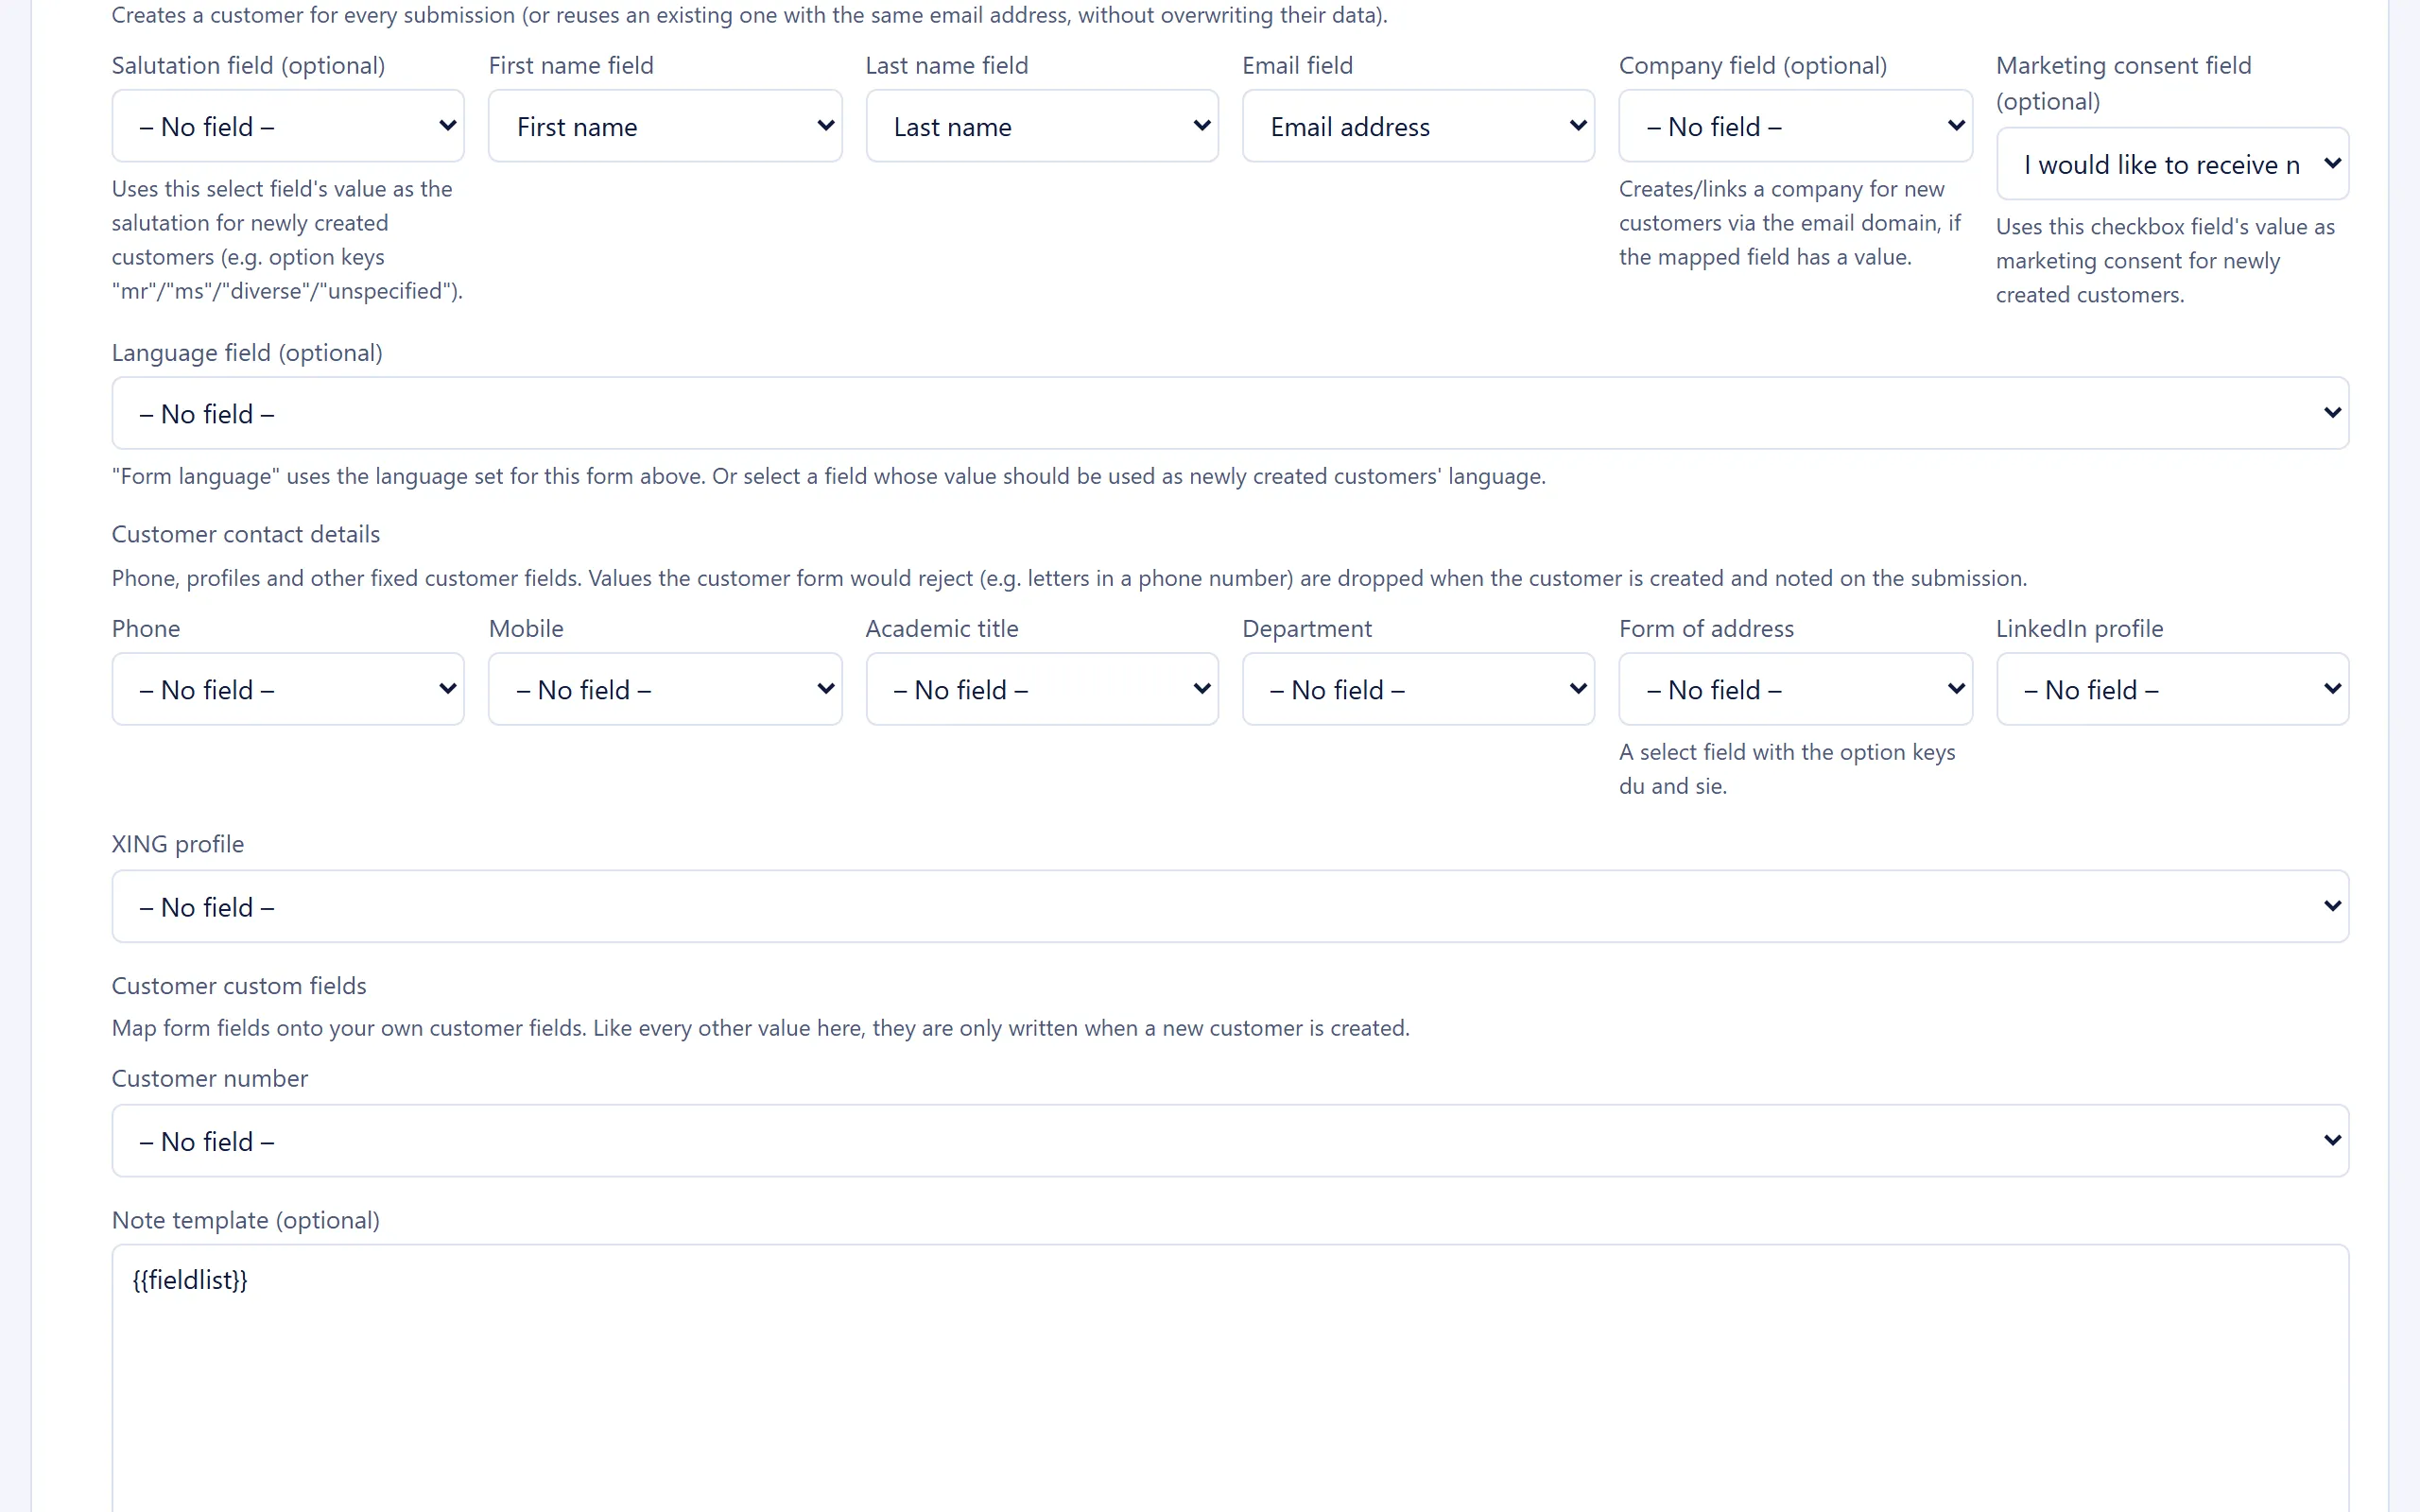
Section titled “Required fields for a new customer”To create a customer, “First name field”, “Last name field” and “Email field” must be mapped. First and last name need a field of type “Text” or “Text area”, and the email needs a field of type “Email”. Without these three mappings, the form can’t be saved (“First name, last name and email field must all be assigned for customer creation.”).
Optional extras: “Company field (optional)”, “Marketing consent field (optional)”, “Salutation field (optional)”, “Language field (optional)”, “Note template (optional)” and the blocks “Customer contact details” and “Customer custom fields”. All these values are only written when a new customer is created.
A single unusable value (letters in a phone number, a date in the wrong format) discards only that one field. The customer is still created, and a note about it appears on the submission under “Customer”. Open tickets with the same email address that aren’t assigned to a customer yet are linked automatically when the customer is created.
Company assignment via the email domain
Section titled “Company assignment via the email domain”A company is only created if “Company field (optional)” is mapped and the visitor has entered something in it. 5sDesk then looks for an existing company by the domain of the email address (primary domain or alias), never by the name entered. If there is no company with this domain, a new one is created with the name entered and this domain.
Personal free email addresses are deliberately excluded: gmail.com, googlemail.com, gmx.de, gmx.net, web.de, outlook.com, hotmail.com, yahoo.de, yahoo.com, t-online.de and icloud.com are never stored as a company domain. A lead with one of these addresses gets a new company without a domain. Two leads from the same company using personal addresses therefore create two separate company records. You can merge them under Duplicate customers/companies.
Field mapping
Section titled “Field mapping”In the “Customer custom fields” block, you map form fields to your customers’ custom fields. Only customer custom fields are available, not company custom fields. If there aren’t any yet, the builder shows the hint “No custom fields have been defined for customers yet” with a pointer to Settings › Custom fields › Customers.
Which form field type fits which custom field type:
| Custom field type | Allowed form field types | Note |
|---|---|---|
| Text, Textarea | Text, Text area, Email, Phone, Select, Hidden field | Free text is copied unchanged. |
| Number | Text, Hidden field | No phone field: spaces and dialling codes would not make a number. |
| Date | Text, Hidden field | Expects the format YYYY-MM-DD, otherwise the value is discarded. |
| Checkbox | Checkbox | |
| Select list | Select | The option keys on both sides must match. |
| Reference | none | An anonymous submission can’t select a record. |
The builder only offers suitable fields in each mapping. An unsuitable combination (for example from an imported form) blocks saving with “The field “…” does not fit the custom field “…”.” When mapping a Select field to a Select list, 5sDesk also checks the option keys: “The option “…” of “…” is missing from the custom field “…”. Please align the option keys.”
If a custom field is archived later, the mapping is silently dropped and the form keeps working. If a form field is removed, its mapping disappears when you save.
Unmapped fields
Section titled “Unmapped fields”Fields without a mapping are not lost. They are stored in full in the submission, appear in the {{fieldlist}} list (the default content of the ticket and emails), and can be inserted individually into any template with {{field.<key>}}. More placeholders: {{fieldlist}} (all fields as a list), {{urlparameter}} (all URL parameters of the embedding page), {{utmlist}} (utm parameters only), {{formurl}}, {{browserlanguage}}, {{timestamp}} and {{formlanguage}}. A “Hidden field” is filled automatically from a URL parameter with the same name on the embedding page. Fields the visitor never saw because of a condition are left out of {{fieldlist}}, so that a checkbox question that was never asked doesn’t show up as “No”.
Double opt-in for marketing consent
Section titled “Double opt-in for marketing consent”If the form contains a consent checkbox, map it under “Marketing consent field (optional)”. Whether this leads to a confirmation email depends on the organisation-wide switch Administration › Settings › “General settings” › “Marketing consent” › “Email confirmation required” (default: off).
A confirmation email is only sent if all four of these apply:
- the checkbox field is mapped as marketing consent,
- the visitor ticked it,
- the customer is new (with “Already existed”, consent is left untouched),
- “Email confirmation required” is switched on.
If the switch is off, consent counts as given immediately.
What the customer experiences
Section titled “What the customer experiences”The customer receives the email “Please confirm your marketing consent”. The link in it is valid for 7 days and can only be used once. Until it is clicked, the customer record shows “Confirmation pending (email sent on …)” and the consent is not yet in effect. Agents can send a new email with “Resend confirmation email”. The old link then stops working. This is possible at most once every five minutes (“Please wait a moment before requesting another confirmation email.”).
If the confirmation email can’t be sent, the customer is still created and the submission still shows “Created” under “Customer”. The full consent lifecycle is described on the CRM page.
Submission destinations
Section titled “Submission destinations”Under “After submitting”, you choose for each form what a submission should turn into. All template fields support the placeholders from the Field mapping section.
| Destination | Required details | What is created |
|---|---|---|
| “Send an email to the customer” | “Recipient (email or hidden field)”, “Sender mailbox”, “Subject”, “Body” | A confirmation email from a connected mailbox. Without a mailbox: “No email mailbox connected - set up a mailbox under Settings → Email inbox first.” |
| “Send an internal notification” | “Specific agent” or “Other email address”, “Subject”, “Body” | A notification email to the team. |
| “Create a CRM customer” | “First name field”, “Last name field”, “Email field” | A customer, plus a company if needed (see above). |
| “Create a card on a board” | “Board”, “Column”, “Headline template”; optional “Card type (optional)”, “Description template (optional)” | A card on the board. If the destination is a pipeline (“Pipelines” group in the board selection), a deal is created in the selected stage. |
| “Create a ticket in the inbox” | none; optional “Department (optional)”, “Sender / reply to (optional)”, “Subject template (optional)”, “Content template (optional)” | A new ticket with the status “Open”. Without templates: subject = form name, content = all field values as a list. |
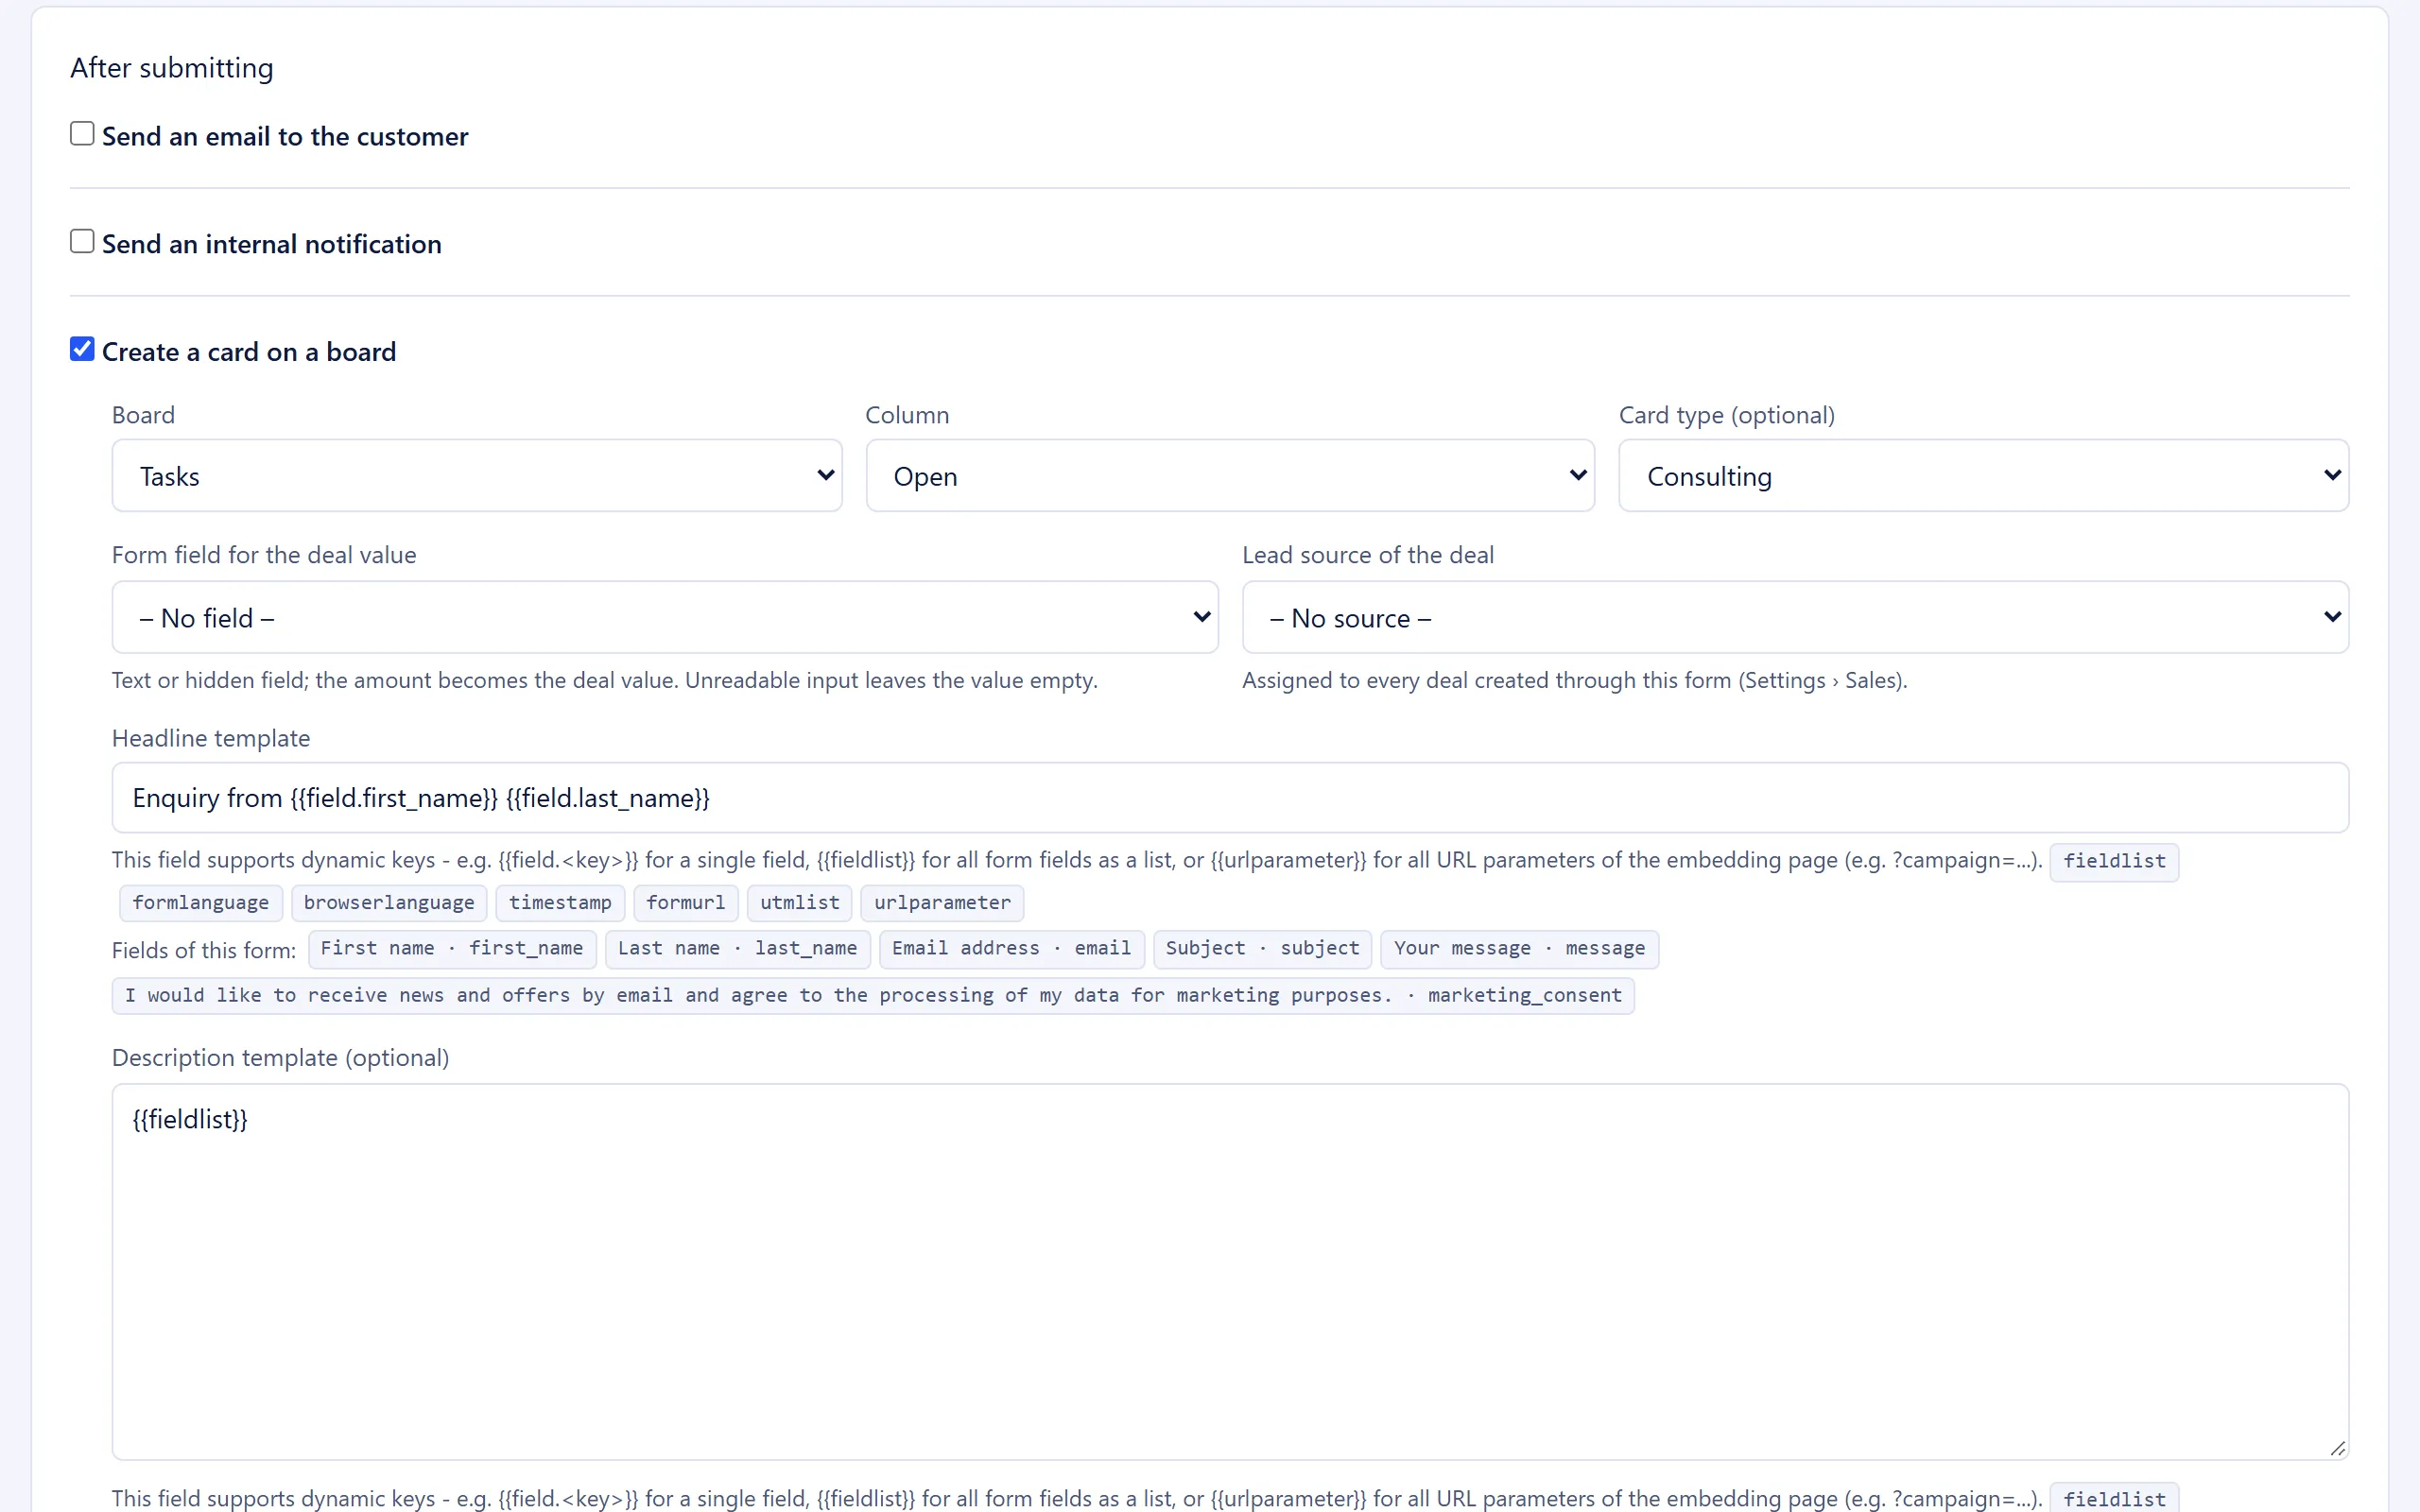
Special cases:
- Deal in a pipeline: “Form field for the deal value” and “Lead source of the deal” are also available. An amount such as “€5000” is recognised; an unreadable value leaves the deal value empty. The company and customer are carried over from step 4. You can find out more under Sales.
- Ticket: The ticket’s reply address is the value from “Sender / reply to (optional)”, otherwise the first email field. The ticket inherits the selected department, goes through that department’s automatic assignment and receives the SLA policy.
- Card and ticket are linked to the customer from step 4 if that step succeeded. If both destinations are active, 5sDesk also links the card or deal and the ticket to each other: the card shows the ticket under “Linked tickets”, and the ticket shows the card under “Linked cards” or the deal under “Linked deals”.
File uploads
Section titled “File uploads”With the “File upload” field type, visitors can send files along with the form. PNG, JPG, GIF, WEBP and PDF are accepted. The server allows at most 3 files per field, 10 MB per file and 25 MB per submission across all file fields. With “Max. number of files” and “Max. file size (MB)”, you can only lower these limits for a field, not raise them.
Where the files end up:
- in the submission itself (available to download there),
- as an attachment to the card or deal,
- as an attachment to the first message of the ticket,
- in emails and templates only as a file name in
{{fieldlist}}, never as an attachment.
No files are stored on the customer record.
Embedding on your website
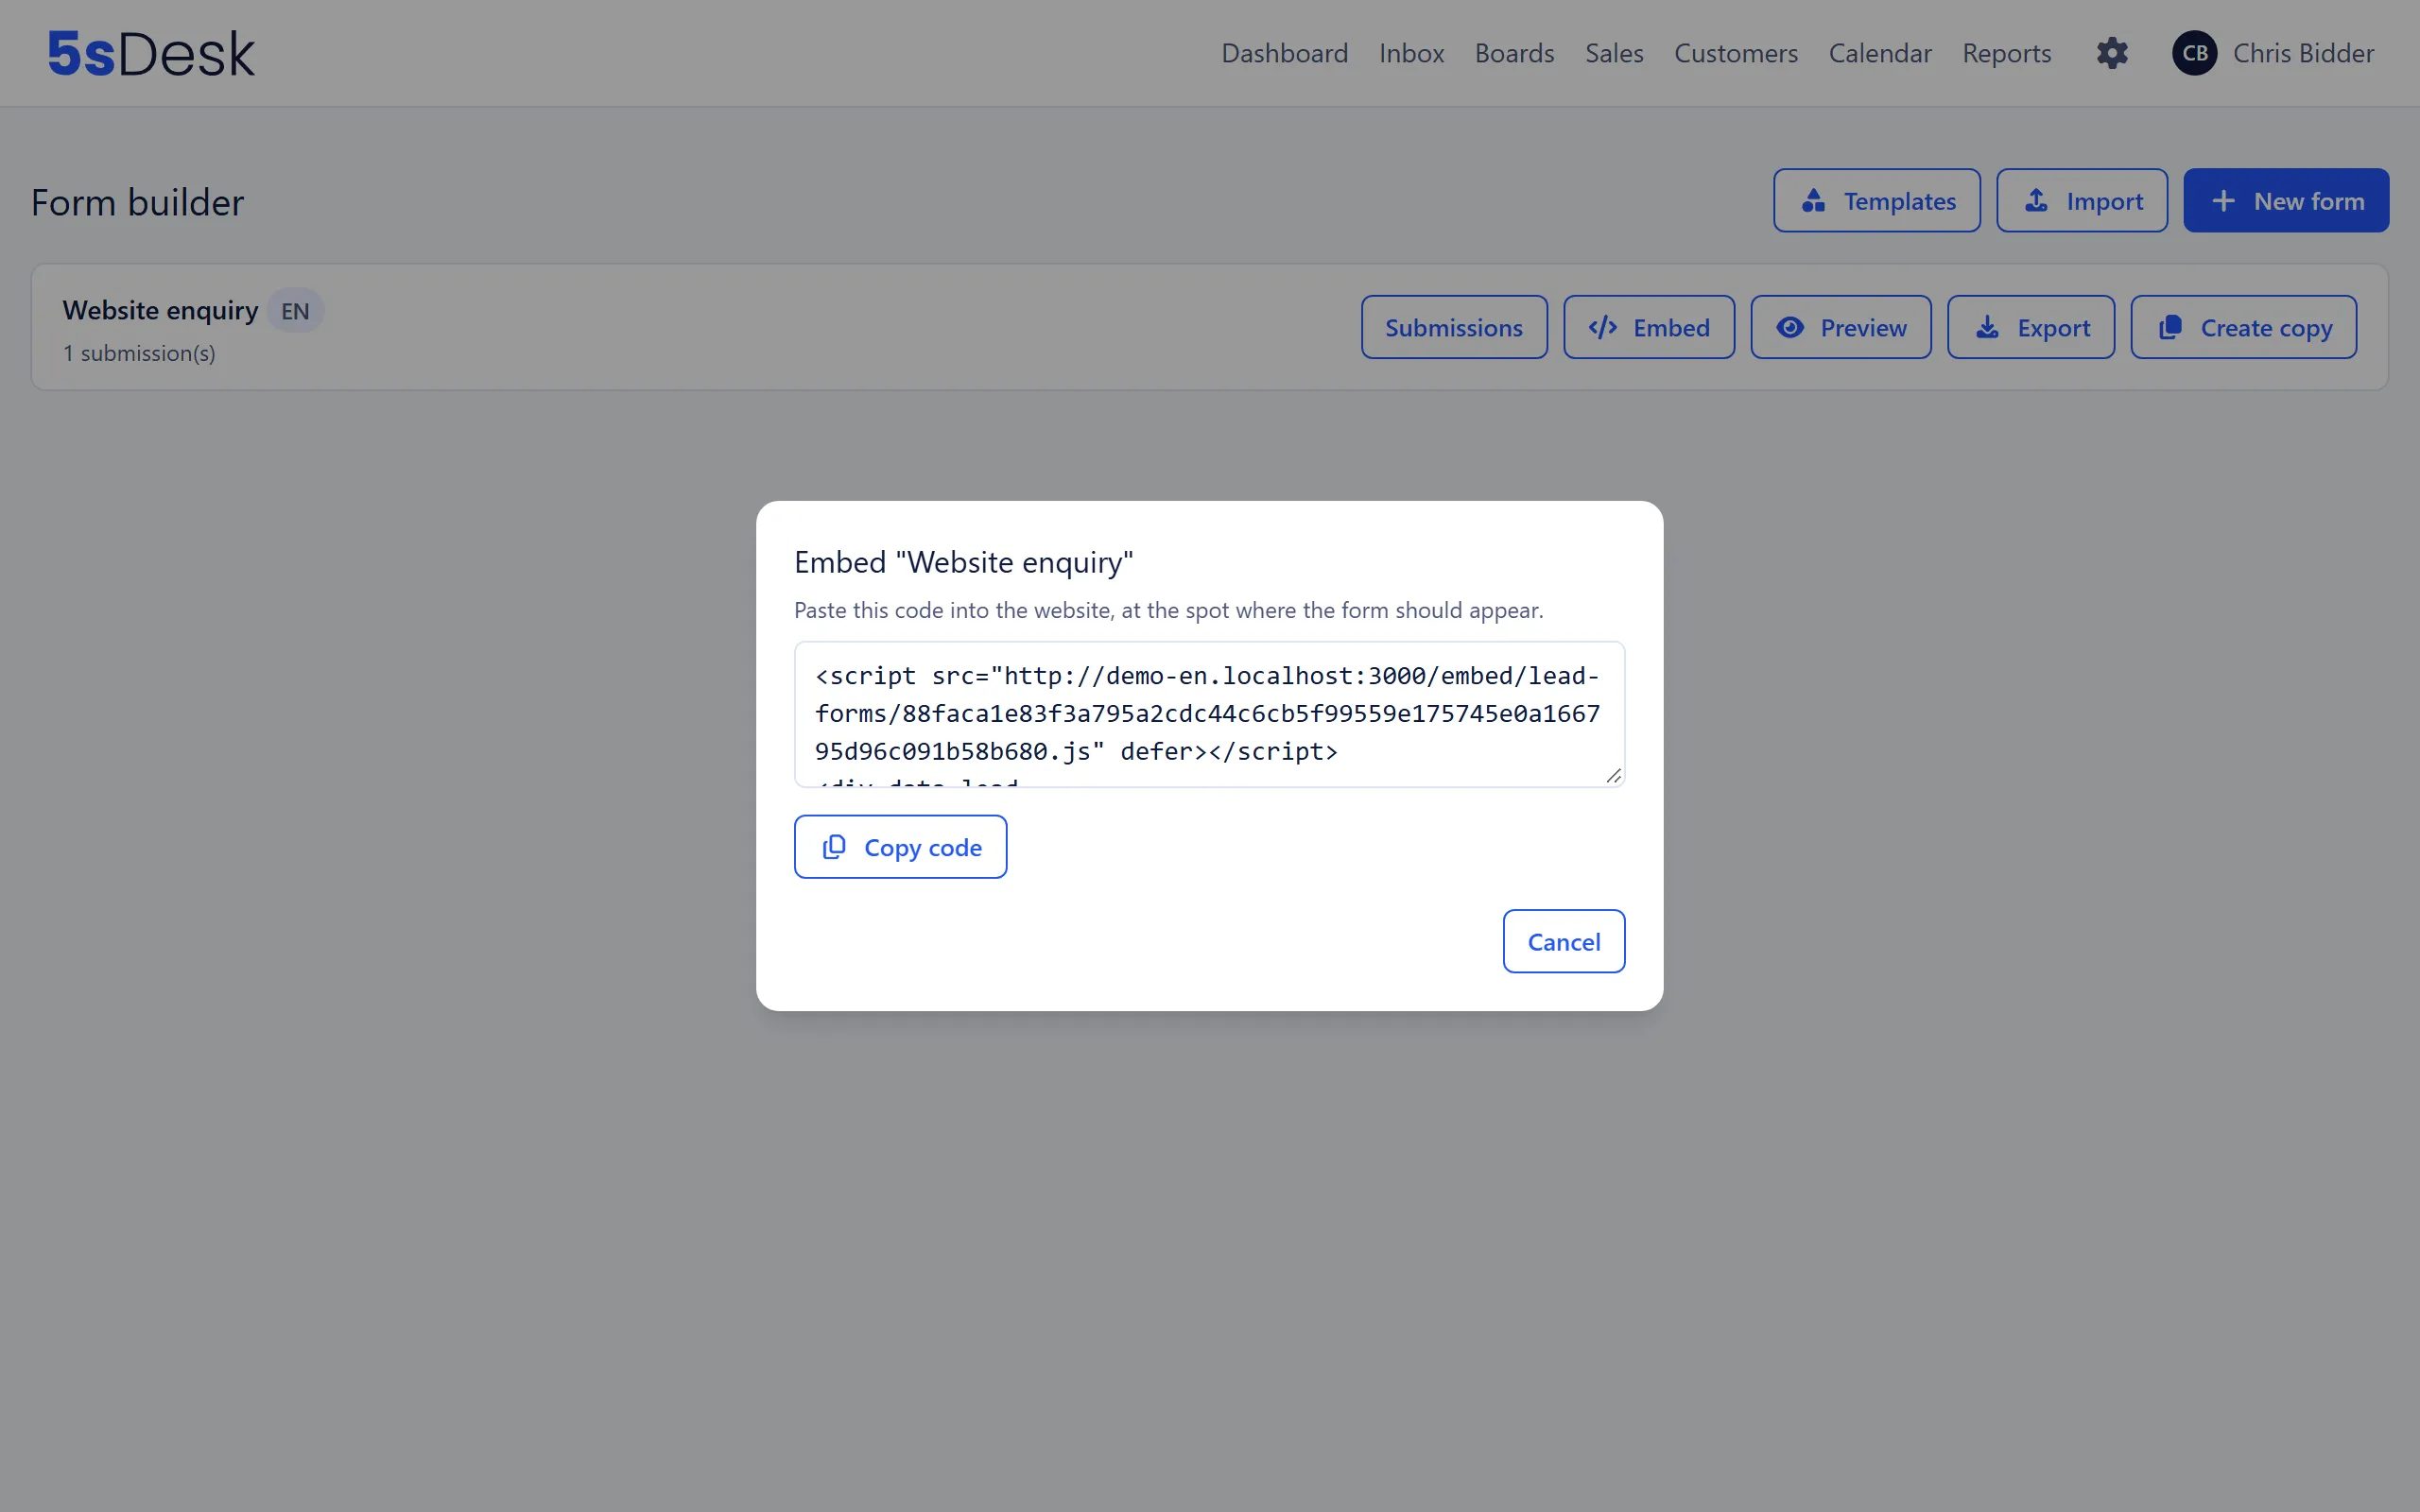
Section titled “Embedding on your website”“Embed” (in the list or in the editor) gives you two lines of code for your web team to paste where the form should go: a script line and an empty element in which the form appears. “Copy code” copies both to the clipboard. You can place several forms on one page, and the script is only loaded once.
What you should know about embedding:
- Isolated area (Shadow DOM): The form runs separately from your website’s stylesheet. Your CSS doesn’t affect it, and the form doesn’t change your page. It fills the width of its container, so it also fits into narrow columns.
- Customising the design: Under “Advanced settings” › “Design”, you set “Submit button colour” and “Submit button text colour” or add a “Custom CSS block”. The builder lists the classes you can target. A custom font must be loaded by the embedding page itself.
- One language per form: “Form language” applies to labels, messages, the confirmation and the customer email. For another language, use “Create copy” or “Copy & translate with AI” to create a separate form and embed its code.
- “Allowed origin domains (optional)”: Empty means the form may be placed on any website. If you enter addresses, only a page from those addresses receives the server’s response. A submission from another site is still accepted and processed; only the browser there can’t read the confirmation. So the list does not protect you against submissions from other sites.
- Unpublishing or archiving switches the embedded form off immediately. Your website then shows “Formular konnte nicht geladen werden.” (“The form could not be loaded.”).
- Without JavaScript, the spot stays empty. There is no standalone form page you could link to instead.
- Prefilling: Fields with a prefill key can be filled by the embedding page through URL parameters or through the script block shown in the builder. For personal data, the builder recommends the script route.
Conversion tracking
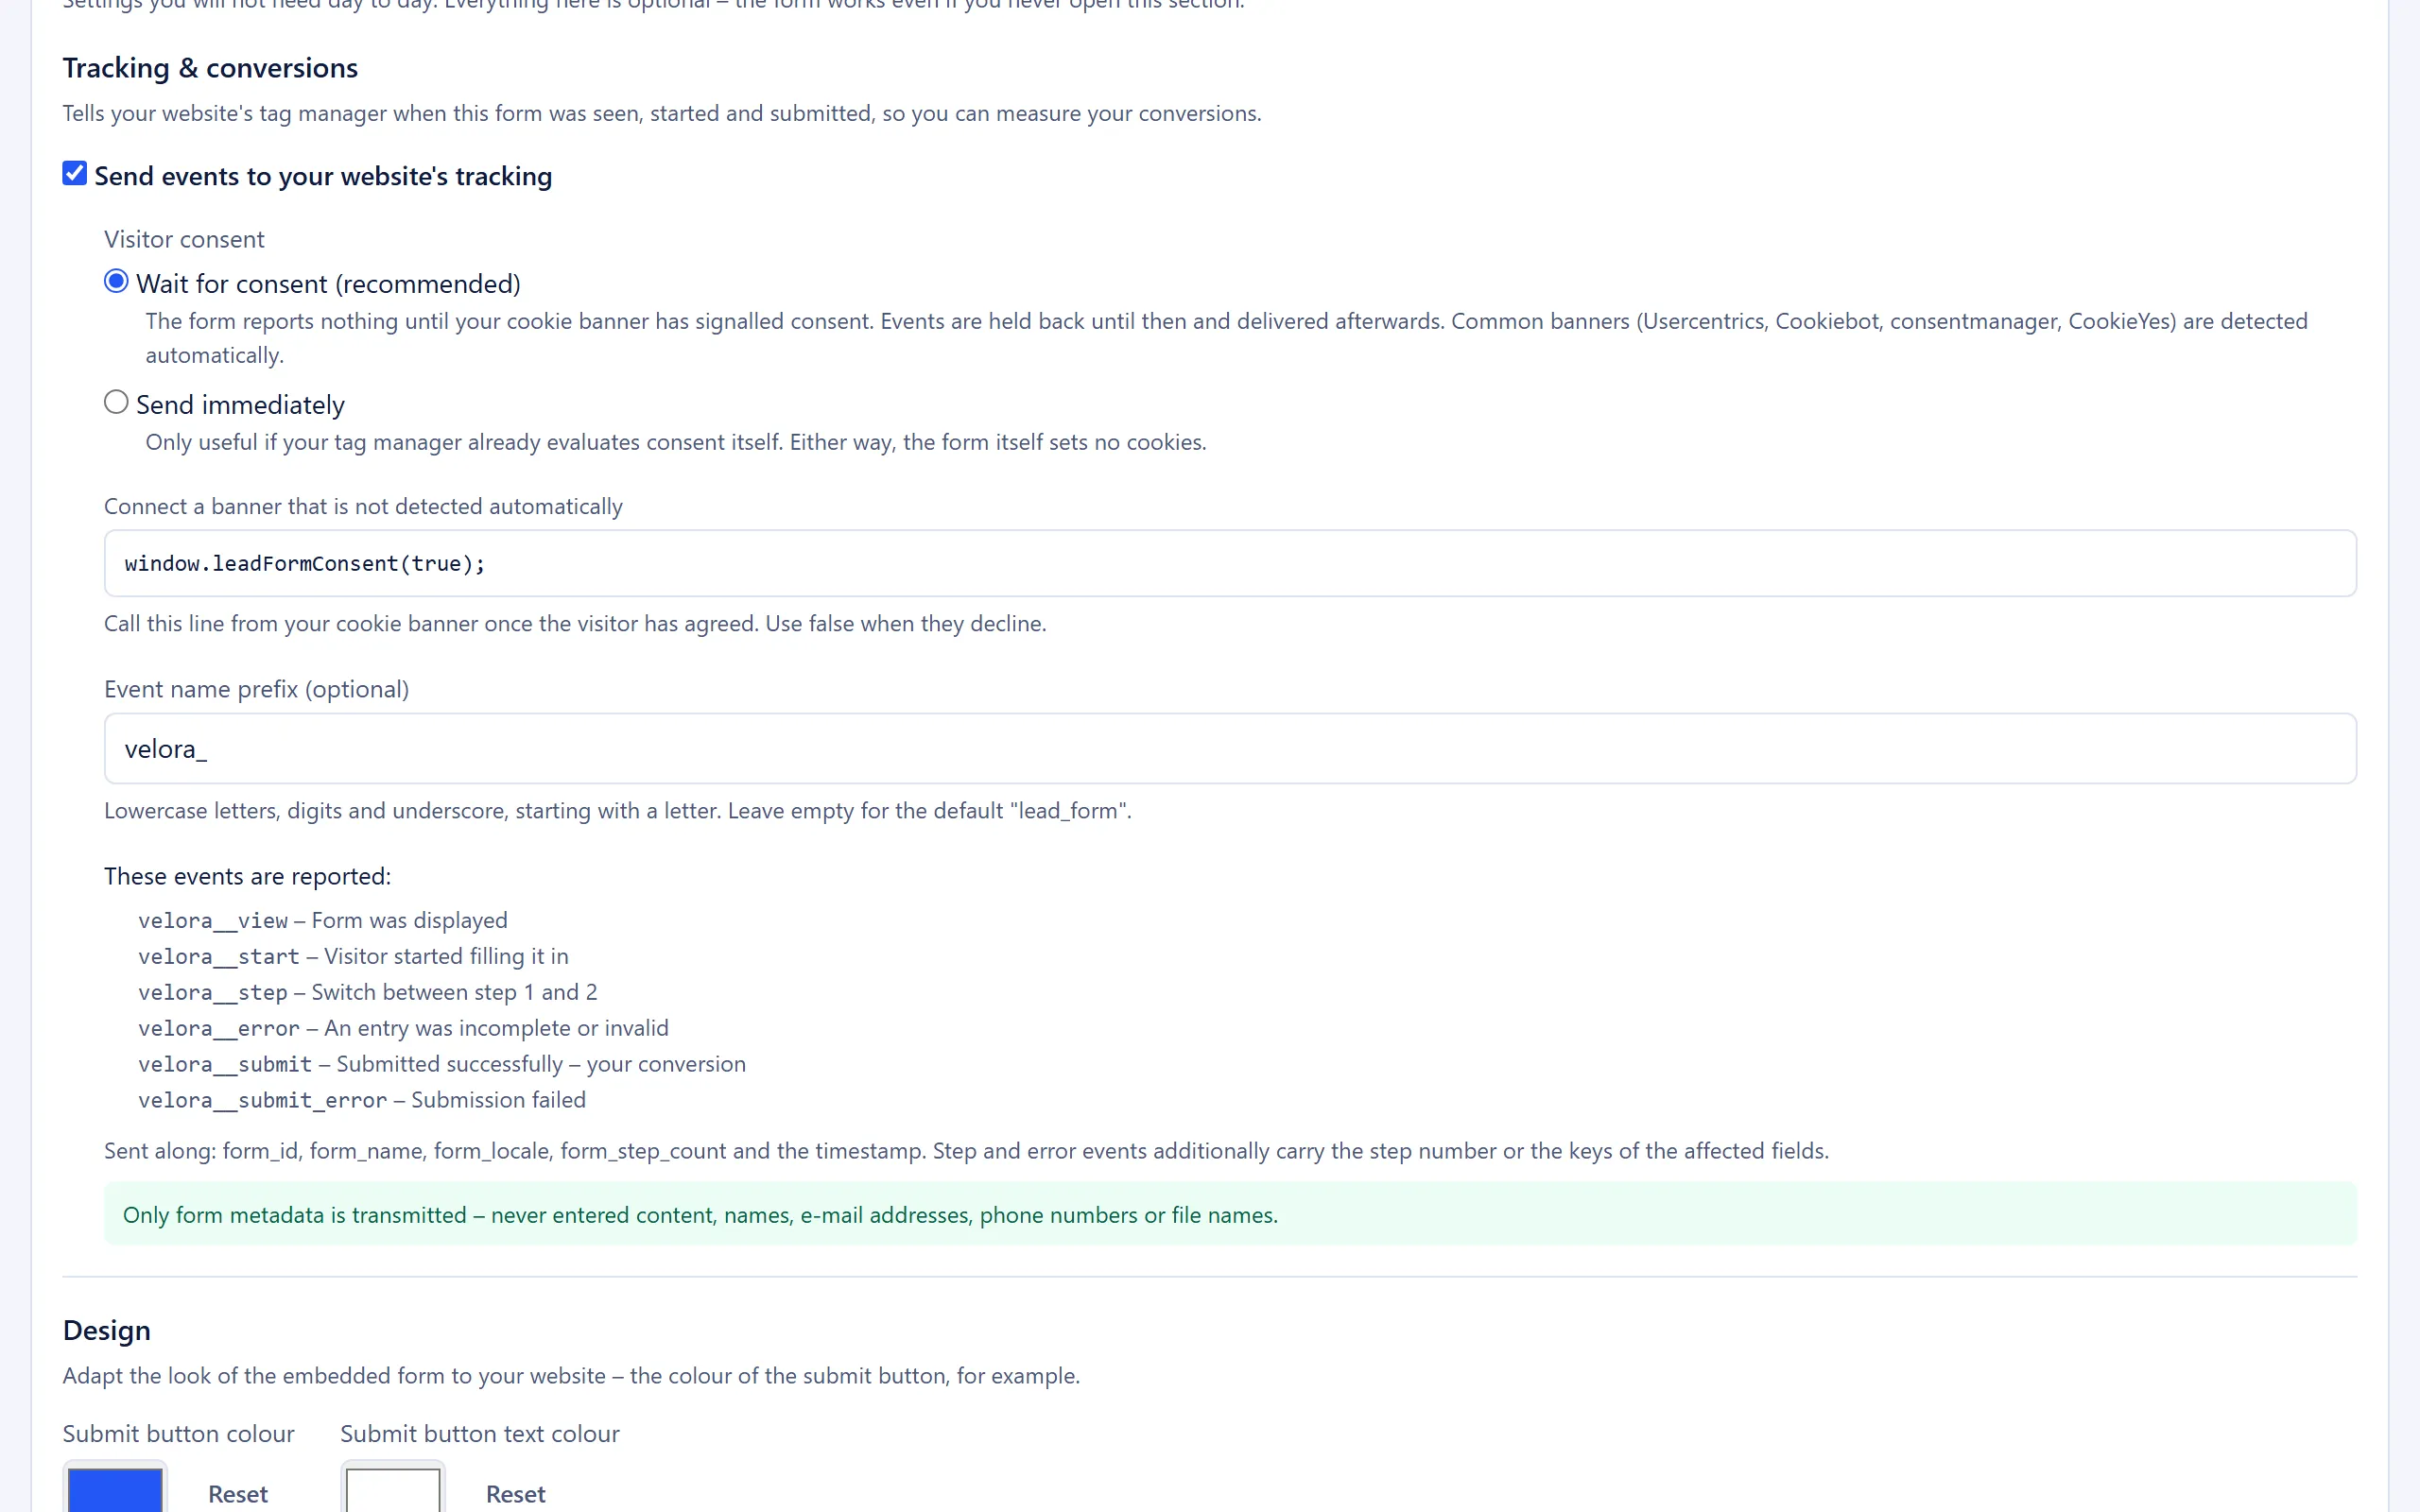
Section titled “Conversion tracking”Under “Advanced settings” › “Tracking & conversions”, switch on “Send events to your website’s tracking”. The form then reports events to the dataLayer of the embedding page, which your tag manager can turn into conversions. 5sDesk doesn’t load a tracking tool of its own and doesn’t set any cookies.
Events reported (prefix lead_form by default, which you can change under “Event name prefix (optional)”):
| Event | Meaning |
|---|---|
lead_form_view |
The form was displayed |
lead_form_start |
The visitor started filling it in |
lead_form_step |
Switch between step 1 and 2 |
lead_form_error |
An entry was incomplete or invalid |
lead_form_submit |
Submitted successfully (your conversion) |
lead_form_submit_error |
Submission failed |
Only form metadata is sent: form_id, form_name, form_locale, form_step_count and the timestamp. Step and error events also include the step number or the keys of the affected fields. Never the content entered, names, email addresses, phone numbers or file names.
Visitor consent:
- “Wait for consent (recommended)”: events are held back until your cookie banner reports consent, then sent afterwards (at most the last 20). If the visitor declines, they are discarded. Banners that follow the IAB TCF v2.2 standard (Usercentrics, Cookiebot, consentmanager, CookieYes) are detected automatically.
- “Send immediately”: only useful if your tag manager evaluates consent itself.
- “Connect a banner that is not detected automatically”: the builder shows a line for your banner to call when the visitor consents (
window.leadFormConsent(true), orfalseif they decline). The same line also reaches an embedded appointment booking on the same page.
Spam protection
Section titled “Spam protection”Protection for the public form has two parts:
- ALTCHA per form: “Enable spam/bot protection (ALTCHA, no third party)” in the editor. It is off by default. ALTCHA is a computational puzzle solved in the browser, with no external provider and no cookies.
- Rate limits: at most 20 submissions in 15 minutes per IP address and 30 submissions per minute per form.
Forms have neither a hidden honeypot field nor a blocklist check. Both were left out on purpose so that genuine enquiries don’t silently disappear.
What a failed ALTCHA proof means: the visitor sees the normal confirmation text, but the submission is discarded. A bot shouldn’t be able to learn from the response why its attempt failed. On submission, the form waits up to 15 seconds for the proof. If it doesn’t arrive (for example because your website’s security policy blocks the computation script), the form is sent without proof and the submission is lost without anyone noticing.
Submission results
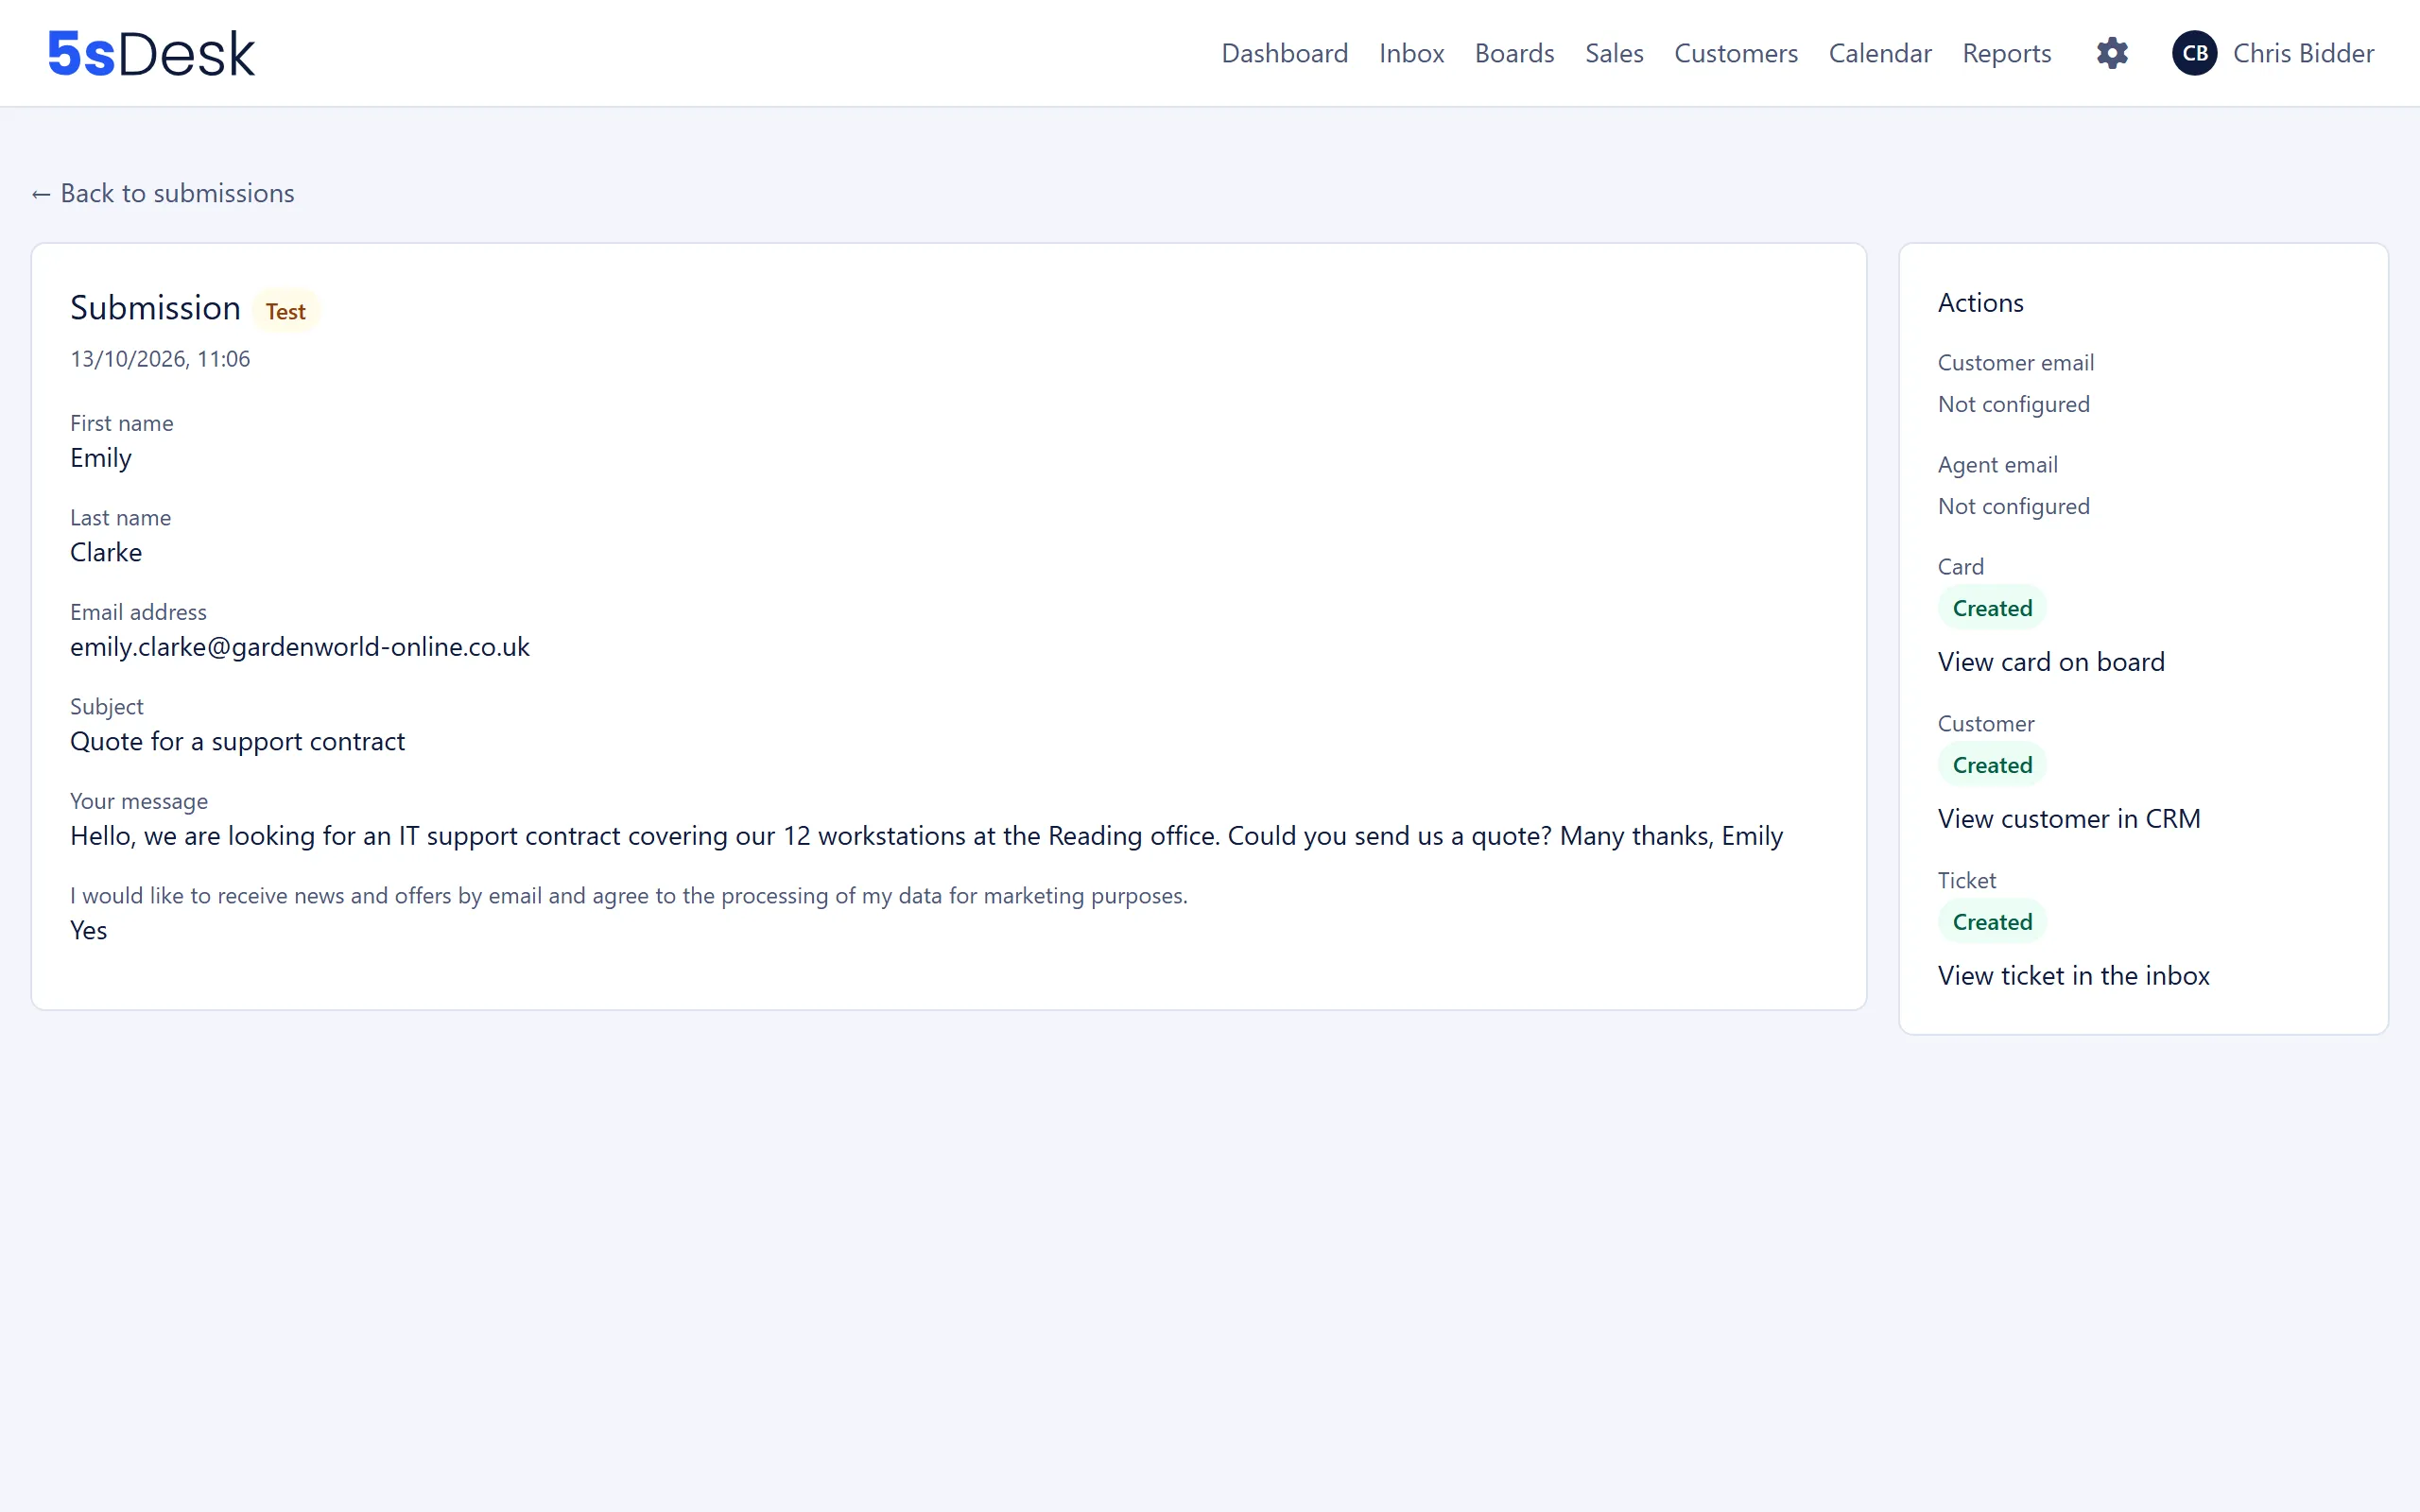
Section titled “Submission results”“Submissions” in the form list shows all submissions for a form. Submissions you haven’t opened yet carry the badge “New”, and submissions from the preview the badge “Test”. Small icons on each row show at a glance whether “Customer email”, “Agent email”, “Card”, “Customer” and “Ticket” succeeded.
The “Submission” detail page shows all field values and files on the left, along with the “Page URL parameters”. On the right, under “Actions”, you’ll find the result of each step:
| Status | Meaning |
|---|---|
| “Sent” | The email was handed over for delivery. |
| “Created” | The customer, card or ticket was newly created. |
| “Already existed” | A customer with this email address already existed and was used. |
| “Failed” | The step failed. The error message is shown below it. |
| “Not configured” | This destination isn’t switched on in the form. |
From there, the links “View card on board”, “View customer in CRM” and “View ticket in the inbox” take you to the linked records. There is no link back to the submission from the card, customer or ticket.
Example flow
Section titled “Example flow”This is how a typical enquiry runs through a contact form with all five destinations:
- Ms Hughes fills in the form on your website, ticks the marketing consent box and attaches a PDF.
- 5sDesk checks ALTCHA, the required fields and the file, and saves the submission. It appears in the list marked “New”.
- Ms Hughes receives the confirmation email from the selected mailbox (“Customer email”: “Sent”).
- The responsible agent receives the internal notification (“Agent email”: “Sent”).
- There is no customer with her address yet, so a new customer is created with first name, last name, company and the mapped custom fields (“Customer”: “Created”). Because “Email confirmation required” is switched on, she also receives the email “Please confirm your marketing consent”, and the customer record shows “Confirmation pending”.
- A deal is created in the selected stage of the pipeline, with the PDF attached and linked to the customer and company (“Card”: “Created”).
- A ticket is created in the inbox with all field values and the PDF, assigned to the selected department and automatically assigned to an agent (“Ticket”: “Created”). The deal from step 6 shows it under “Linked tickets”.
- Six days later, Ms Hughes clicks the confirmation link. Her marketing consent is now in effect.
Related settings
Section titled “Related settings”- Custom fields: create the customer custom fields you map in the form.
- General settings: the “Email confirmation required” switch for marketing consent.
- Email inbox: the mailbox the customer email is sent from.
- Delivery blocks: addresses that no longer receive automatic emails (including form confirmations).
- CRM: the marketing consent lifecycle and duplicates.
- Sales: deals from forms in a pipeline.